Continuous Delivery of Microservices using Concourse.ci, Cloud Foundry and Artifactory
This tutorial takes a simple microservice architecture and explains how to set up a Concourse pipeline in order to test and deploy individual microservices independently without affecting the overall system. Cloud Foundry will be used as the platform to which the microservices are deployed.
Along the way, all basic Concourse.ci concepts are explained.
We'll use one git repository for each microservice!
The goal of the Concourse pipeline — which is built during this tutorial — is to automatically trigger and execute the following steps whenever a developer pushes a change to a git repository:
- The pipeline pulls the code base of the changed microservice.
- Run unit tests.
- If the app/microservice is written in a language that requires compilation, the pipeline will compile the source code.
- Next, the pipeline will deploy the change automatically to the test environment. Before the pipeline deploys the change, both environments test and production consist of the same microservice versions — so we can ensure the deployment will also work in production.
- Run smoke tests (a kind of integration test) to verify the change doesn't break other microservices.
- Once the smoke tests in the test environment succeed (or fail), the pipeline should send out a notification via email (Slack can also be used instead of email).
- The deployment into the production system must be triggered manually via the Concourse web interface but is then deployed to the production system automatically.
The steps above describe a common pattern for building a continuous delivery pipeline, but you should discuss within your team which steps are required for each specific project. For example, there could be more than one test environment that a change must pass before it's deployed to production.
I've prepared a simple microservice architecture that can be used during this tutorial. It's an architecture consisting of two services: a customer service written in Java and an order service written in Node.js. Links to the repositories are provided later.
Note that "concourse" and "concourse.ci" are used as synonyms throughout this article.
Prerequisites
To follow this tutorial, a few things are required:
- A GitHub account because you have to fork the repositories in order to push changes.
- A Cloud Foundry account with the Space Developer role in two application spaces. One space will be used to deploy the testing environment and the other one for the production environment. You can use public Cloud Foundry targets like anynines or run.pivotal.io. Some of them have free/trial plans.
- You should be able to create a PostgreSQL service instance in each Cloud Foundry space. MySQL should also work but has not been tested.
- A Concourse.ci server. For testing purposes, you can set up a Concourse server on your local machine, but it's not intended to be a durable solution. The installation requires Vagrant and VirtualBox and will be explained in the next step. Alternatively, you can use Docker Compose to deploy a Concourse server.
- A JFrog Artifactory server. For testing purposes we set one up locally in the relevant section of this tutorial.
- A free Docker Hub account.
- A Docker engine running locally to build and upload your own Docker images.
Set Up a Concourse.ci Server with Vagrant
To get started fast, you'll set up a Concourse server on your local machine.
In this step, we use Vagrant to get a Concourse.ci server up and running. This means you have to install Vagrant and VirtualBox before you can continue.
Once you've installed Vagrant, execute:
cd [an empty directory]
vagrant box add concourse/lite --box-version 2.5.0
vagrant init concourse/lite
vagrant up
When vagrant up doesn't start and repeatedly prints the following warning message:
default: Warning: Connection timeout. Retrying...
Open the Vagrantfile — which has been created by the vagrant init command — and insert the following lines (lines 10-12):
Vagrant.configure(2) do |config|

  config.vm.provider :virtualbox do |v|
    v.customize ["modifyvm", :id, "--cableconnected1", "on"]
  end
After changing the Vagrantfile, run:
vagrant halt
vagrant up
When everything works, you should be able to open http://192.168.100.4:8080/ in your browser. Authentication is disabled in the local setup.
Increase Memory for the Vagrant VM
On my MacBook I had the issue that everything gets really slow when building the Java application. To fix this, increase the memory for the Vagrant VM to 4GB by adding this line to the Vagrantfile:
config.vm.provider :virtualbox do |v|
  v.customize ["modifyvm", :id, "--cableconnected1", "on"]
  v.memory = 4096
end
Install the fly CLI and log in
The Concourse web interface is only used for displaying the state of the pipelines and for triggering pipelines manually. All other tasks are performed via the fly CLI — creating new pipelines, deleting pipelines, etc.
You can download the fly CLI as a precompiled binary from GitHub.
To install the CLI on macOS:
curl -L https://github.com/concourse/fly/releases/download/v2.5.1-rc.9/fly_darwin_amd64 -o fly
chmod +x fly
sudo mv fly /usr/bin/fly
The download link differs for each operating system.
To communicate with the Concourse server via CLI, log in:
fly --target local login --concourse-url http://192.168.100.4:8080
The Concourse server and the fly CLI should have the same version. If they differ, run fly -t local sync and the fly CLI will upgrade/downgrade itself to match the server version.
Learn the basic Concourse.ci concepts and set up a hello world pipeline
To verify that our Concourse setup is working correctly, let's create a simple pipeline. But first, let's look at what "pipeline as code" means.
Pipeline as Code
Concourse realizes the concept of "pipeline as code".
Concourse is built around the concept of pipeline as code. This means we don't click in the web interface to create and configure pipelines — instead they get described in a YAML file.
The pipeline as code concept has the following benefits:
- You can use a source code management system like Git to manage pipelines, making it easy to collaborate with built-in versioning that allows you to trace changes.
- It's possible to roll back changes to pipelines very easily using tools you already know, like Git.
- It's possible to set up the same pipeline on different Concourse servers by simply changing the target of the fly CLI.
- In Concourse it's possible to extract "tasks" into separate YAML files which can then be reused within different pipelines.
Where to put the pipeline code?
Best Practice: Pipeline code should be stored in the same repository as the application that is deployed by the pipeline.
Since we use one code repository for each microservice, the pipeline will also be distributed across different code repositories. Each microservice code repository will contain a ci directory within the root directory. Inside the ci directory we'll have another directory called pipelines where the YAML files are stored.
First simple pipeline without deploying anything
A Concourse pipeline is not required to deploy something. Abstractly speaking, Concourse provides mechanisms to observe resources and orchestrate the execution of bash scripts.
Hint: Don't skip this step because it's a good proof that the Concourse installation works correctly.
Create a ci directory and a hello-world.yml file:
mkdir ci
touch ci/hello-world.yml
Insert the following content into ci/hello-world.yml:
jobs:
- name: hello_world_job
  plan:
  - task: hello_world_task
    config:
      platform: linux
      image_resource:
        type: docker-image
        source: { repository: ubuntu }
      run:
        path: echo
        args:
        - "Hello World"
Upload the pipeline to the Concourse server:
fly -t local set-pipeline --pipeline hello-world --config ci/hello-world.yml
Every time you change the pipeline specification, the set-pipeline subcommand will print all differences. Confirm the changes by typing y.
Once uploaded, you'll see the pipeline in the web interface:
The pipeline won't execute yet because it's paused. Unpause it and start a build:
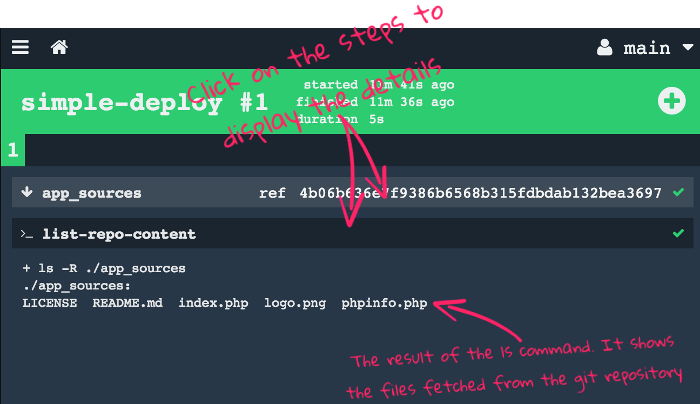
Once the pipeline is finished, you can click on "hello_world_task" to see the stdout:
Congratulations! You've just configured your first Concourse pipeline.
Alternatively, you can use the fly CLI to unpause and start:
fly -t local unpause-pipeline --pipeline hello-world
fly -t local trigger-job --job hello-world/hello_world_job --watch
Concourse.ci Concepts
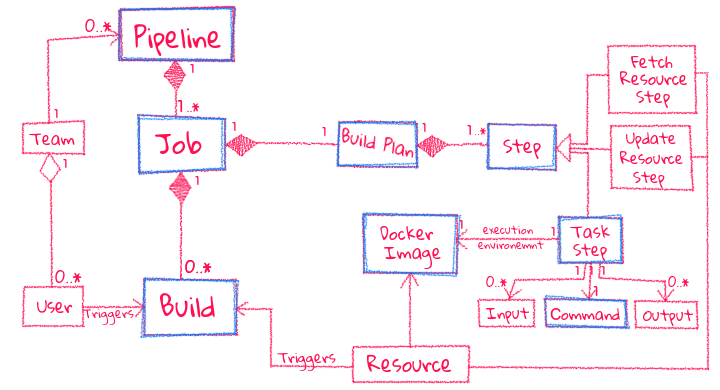
Pipelines are the central concept in Concourse. A pipeline describes the stages (quality gates) a change must pass before it gets released. For this tutorial the stages are:
- Running unit tests
- Deploy to the test environment
- Execute smoke tests
- Deploy to the production environment
Resources are intended to flow through pipelines whenever they change. A resource can be defined as an input of one or multiple jobs. In this tutorial we'll define two Git resources, one for each microservice. Concourse polls the git repository periodically to detect new commits. Once a change is detected, Concourse clones the repository and passes all files to the jobs. Besides pulling, Concourse also provides the ability to update a resource (e.g., publishing a built artifact).
Jobs describe the actual work a pipeline does. A job consists of a build plan with multiple steps that can run in parallel or sequentially.
- Fetch Resource Steps (
get) — tells Concourse which resources are required - Task Steps — a shell command (or script) executed inside a Docker container
- Update Resource Steps (
put) — updates a resource persistently
The Hello World pipeline explained
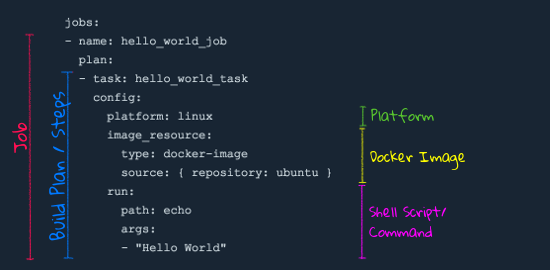
The hello world pipeline has exactly one job with exactly one task in its build plan.
The platform specifies which type of worker should execute the task (linux, windows, or darwin). Even if there are only Linux workers, you must specify it because pipeline definitions are not coupled to specific Concourse setups.
The image_resource specifies a Docker image for the container in which the task executes. This decouples the task from the worker — different tasks can use different versions of the same dependency.
The run block contains the command to execute inside the container. To execute multiple commands in one task:
jobs:
- name: hello_world_job
  plan:
  - task: hello_world_task
    config:
      platform: linux
      image_resource:
        type: docker-image
        source: { repository: ubuntu }
      run:
        path: sh
        args:
        - -exc
        - |
          whoami
          date
          echo "Hello World"
Hello World with Resources
Let's extend the hello world pipeline with resources. We'll do it in three steps:
Pro Tip: Always make baby steps to the desired result and evaluate each step. This saves a lot of troubleshooting time.
Step 1 — Fetch Git Resource
Create simple_deploy.yml:
resources:
- name: app_sources
  type: git
  source:
    uri: https://github.com/fermayo/hello-world-php

jobs:
- name: simple-deploy
  plan:
  - get: app_sources
  - task: list-repo-content
    config:
      platform: linux
      inputs:
      - name: app_sources
      image_resource:
        type: docker-image
        source: { repository: ubuntu }
      run:
        path: sh
        args:
        - -exc
        - |
          ls -R ./app_sources
The resources block declares and configures the resources used in the pipeline. The get step fetches the latest version, and the inputs block makes the resource available inside the task container as a directory named after the resource identifier.
Upload and run:
fly -t local set-pipeline --pipeline simple-deploy --config ci/simple_deploy.yml
fly -t local unpause-pipeline --pipeline simple-deploy
fly -t local trigger-job --job simple-deploy/simple-deploy --watch
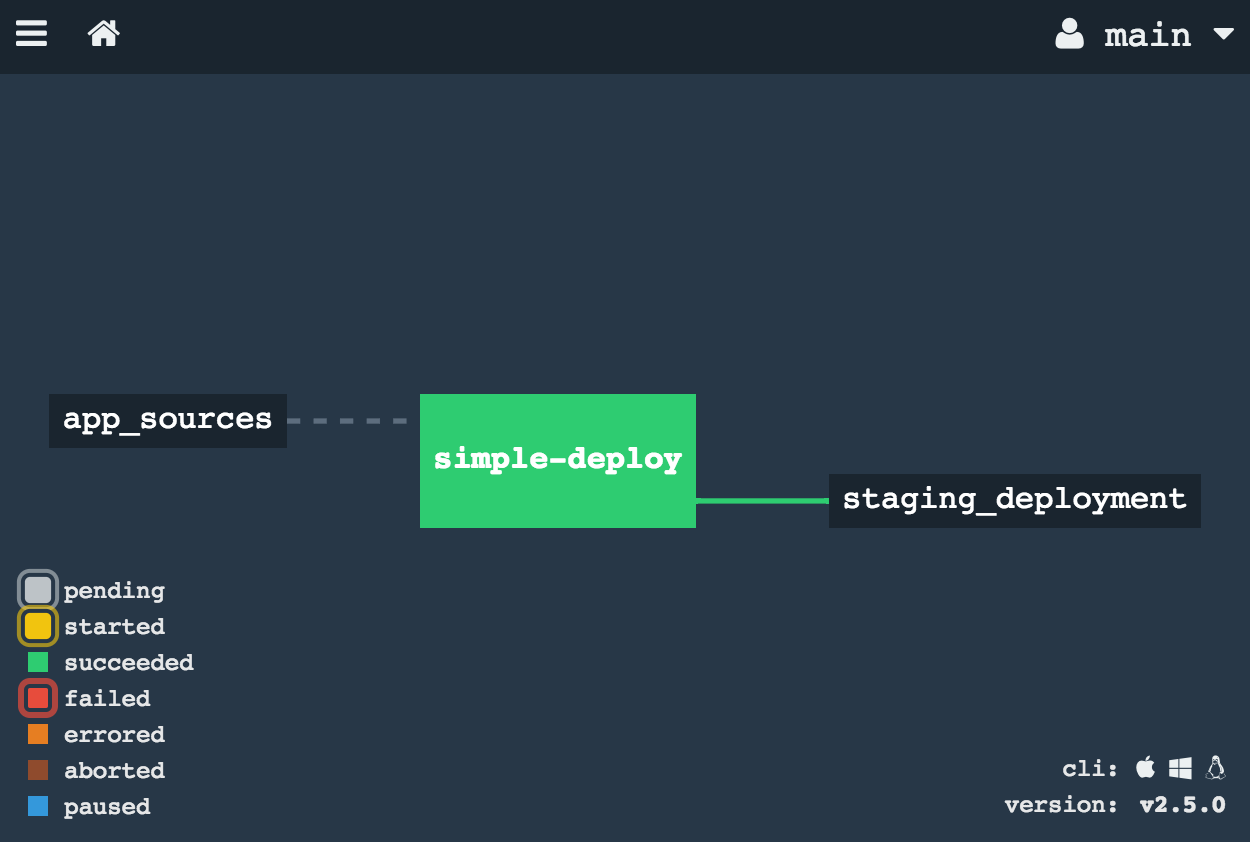
Step 2 — Deploy the app to Cloud Foundry
Now we add a Cloud Foundry resource to push the application:
resources:
- name: app_sources
  type: git
  source:
    uri: https://github.com/wolfoo2931/concourse-ci-hello-world.git
- name: staging_deployment
  type: cf
  source:
    api: https://api.aws.ie.a9s.eu
    username: your-user
    password: your-password
    organization: your-org
    space: dev
    skip_cert_check: false

jobs:
- name: simple-deploy
  plan:
  - get: app_sources
  - put: staging_deployment
    params:
      manifest: app_sources/manifest.yml
Bad Practice: Don't write passwords and other secrets directly into the pipeline YAML. We'll refactor this later!
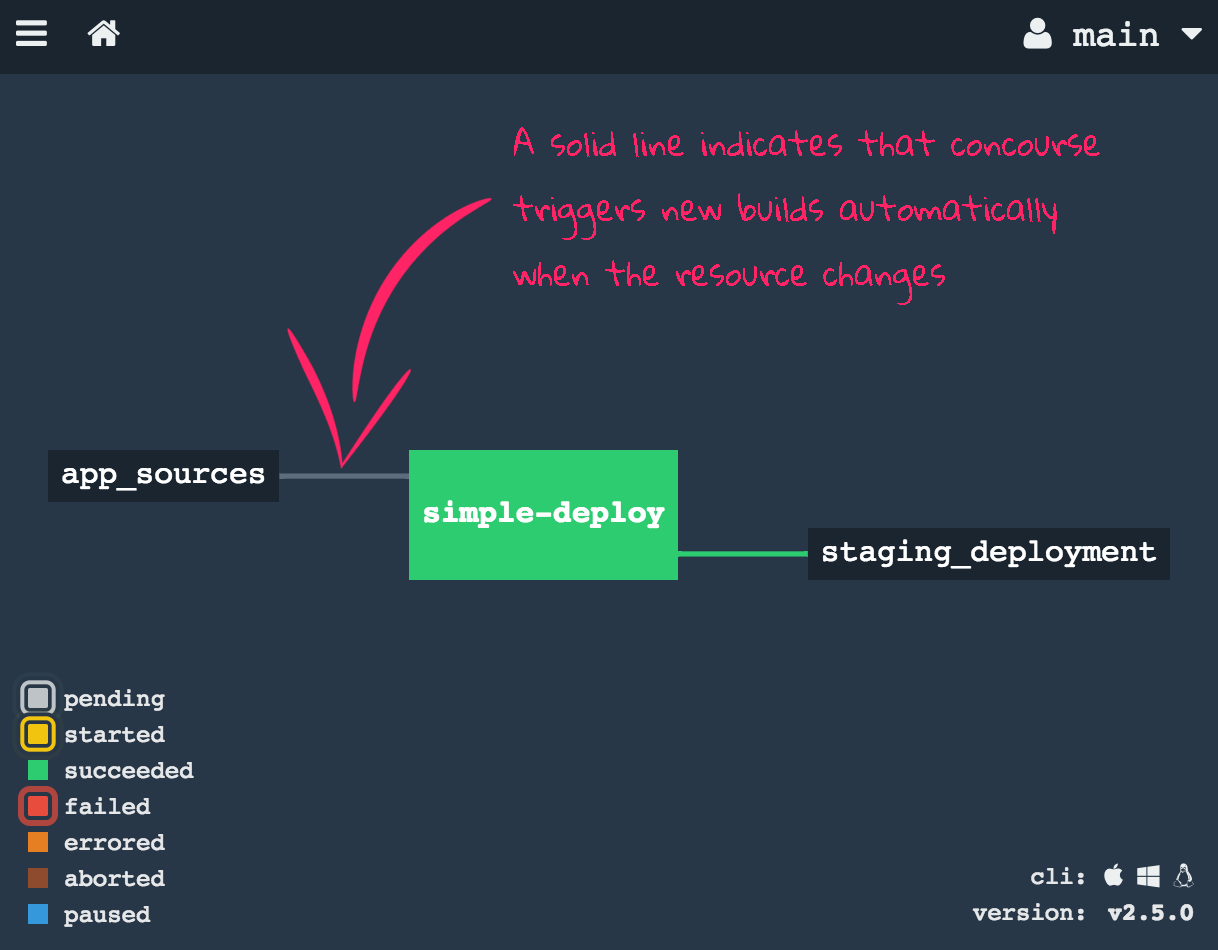
Step 3 — Trigger Builds Automatically
Add trigger: true to automatically start builds when new commits are detected:
  - get: app_sources
    trigger: true
Add serial: true to the job to prevent parallel builds from conflicting:
jobs:
- name: simple-deploy
  serial: true
  plan:
  - get: app_sources
    trigger: true
  - put: staging_deployment
    params:
      manifest: app_sources/manifest.yml
There are still things missing: unit tests, credential management, zero-downtime deployments, multi-environment deploys, and pipeline refactoring. These are addressed in the next sections.
Pipe the first service to production (Java App)
The UAA is our open source guinea pig for this section. It's a useful general purpose component written in Java.
In this section we specify a pipeline which tests, builds and deploys a Java application. The application is the UAA (User Account and Authentication), a service originally developed as a component of Cloud Foundry. It implements OAuth 2.0 and SCIM. The UAA is a general purpose service that can be reused in any microservice architecture.
The source code of the UAA is on GitHub.
The roadmap for this section:
- Create the code repo, set up the file structure, and insert pipeline code to check out the UAA Git repository.
- Create a Docker image to provide all dependencies required to run the UAA unit tests.
- Specify a Concourse job to run the UAA unit tests and build a WAR file.
- Store the WAR file to Artifactory.
- Create PostgreSQL instances in the test and production environment.
- Specify a Concourse job to deploy the UAA to the test environment.
- Send an email once a new version of the UAA is deployed to the test environment.
- Specify a Concourse job to deploy the UAA to the production environment.
Step 1 — Set Up Git Repo for the Pipeline
Since we are not the owner of the UAA repository, we create a dedicated Git repository to store the UAA pipeline.
mkdir concourse-ci-tutorial
cd concourse-ci-tutorial
mkdir -p ci/pipelines
touch ci/pipelines/uaa.yml
git init
git add .
git commit -m "initial file structure"
Step 2 — Create and Publish a Docker Image
Install the Docker engine locally and sign up for a free Docker Hub account if you haven't already.
Create a Dockerfile:
mkdir -p ci/dockerfiles/uaa
touch ci/dockerfiles/uaa/Dockerfile
With the content:
FROM java:8-jdk
Build and push:
docker build -t youraccount/uaa ci/dockerfiles/uaa/Dockerfile
docker login
docker push youraccount/uaa
Replace "youraccount" with your Docker Hub account.
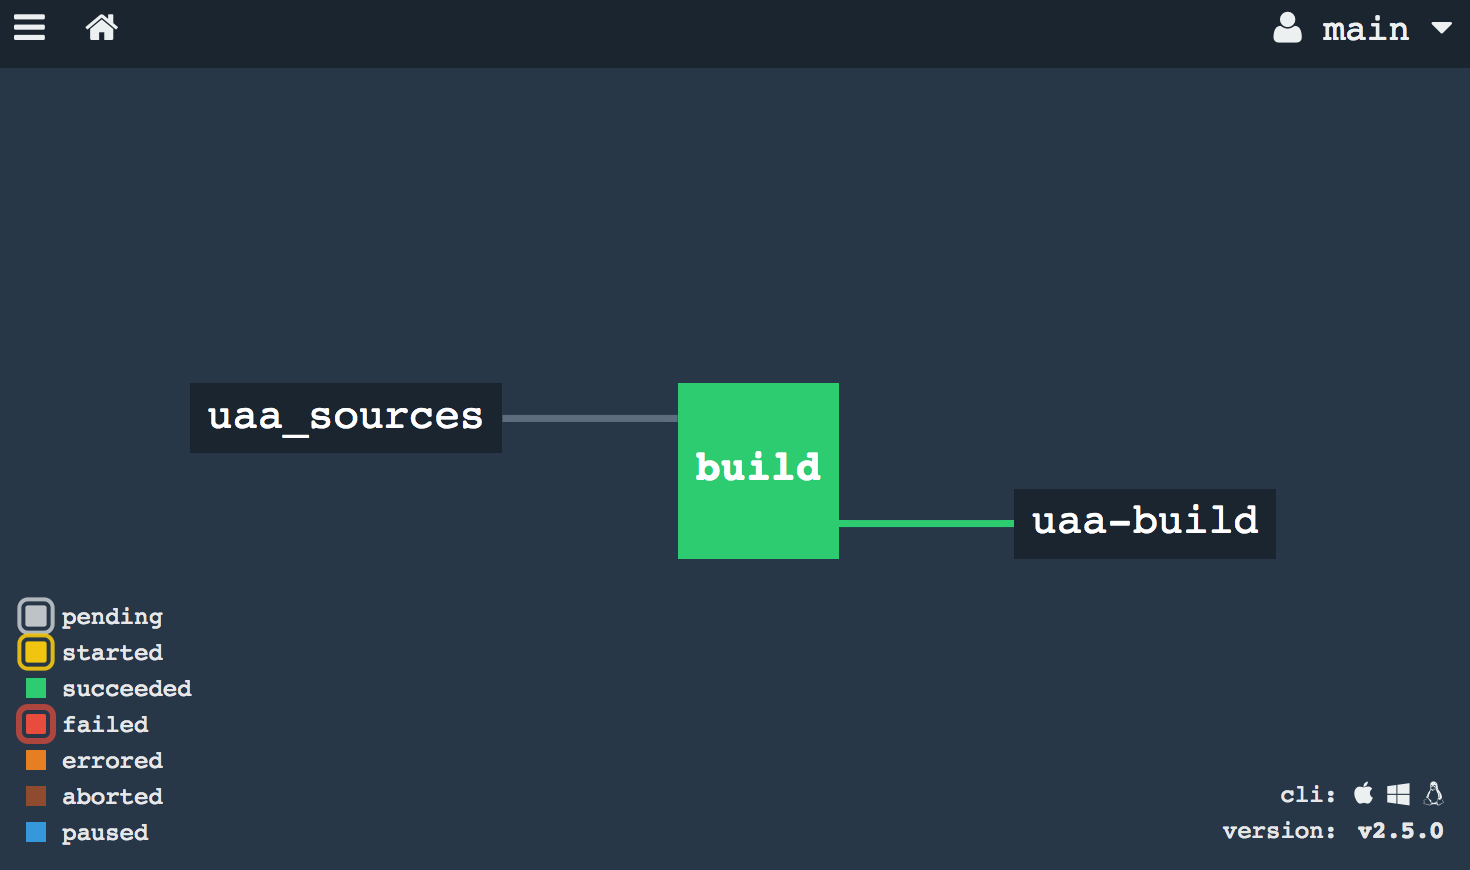
Step 3 — Build the UAA and run unit tests
Open ci/pipelines/uaa.yml and insert:
resources:
- name: uaa_sources
  type: git
  source:
    uri: https://github.com/cloudfoundry/uaa.git
    tag_filter: '3.6.*'

jobs:
- name: build
  plan:
  - get: uaa_sources
    trigger: true
  - task: build
    config:
      platform: linux
      inputs:
      - name: uaa_sources
      outputs:
      - name: uaa_war
      image_resource:
        type: docker-image
        source: { repository: youraccount/uaa }
      run:
        path: sh
        args:
        - -exc
        - |
          export TERM=dumb
          cd uaa_sources
          ./gradlew test
          ./gradlew :cloudfoundry-identity-uaa:war
          mv uaa/build/libs/cloudfoundry-identity-uaa-*.war ../uaa_war
The tag_filter: '3.6.*' tells Concourse to only trigger the pipeline on commits tagged with versions matching that glob.
The outputs block is how you move content from one step to the next. Without it, every file created in a step is deleted when the task finishes.
Upload and run:
fly -t local set-pipeline --pipeline uaa --config ci/pipelines/uaa.yml
Running the tests might take about 40 minutes when running Concourse on your local machine!
Step 4a — Set Up Local Artifactory Server
Artifactory is a widely used open source system for managing software packages. We'll store the WAR file in Artifactory so we don't have to rebuild it for each environment.
docker pull docker.bintray.io/jfrog/artifactory-oss
docker run -p 8081:8081 docker.bintray.io/jfrog/artifactory-oss
Find your Docker engine IP:
docker-machine ip default
# 192.168.99.100
Open http://192.168.99.100:8081 in your browser. Default credentials: admin / password.
Configure a new local repository:
- Click "Admin" on the left side
- Click "Local" below the "Repositories" section
- Click "New" in the upper right corner
- Select package type "Generic"
- Enter repository key:
war-files - Click "Save & Finish"
Step 4b — Store the WAR file to Artifactory
Extend the pipeline with the Artifactory resource:
resource_types:
- name: artifactory
  type: docker-image
  source:
    repository: pivotalservices/artifactory-resource

resources:
- name: uaa_sources
  type: git
  source:
    uri: https://github.com/cloudfoundry/uaa.git
    tag_filter: '3.6.*'
- name: uaa-build
  type: artifactory
  source:
    endpoint: http://192.168.99.100:8081/artifactory
    repository: "/war-files/uaa"
    regex: "cloudfoundry-identity-uaa-(?<version>.*).war"
    username: admin
    password: password
    skip_ssl_verification: true

jobs:
- name: build
  plan:
  - get: uaa_sources
    trigger: true
  - task: build
    config:
      platform: linux
      inputs:
      - name: uaa_sources
      outputs:
      - name: uaa_war
      image_resource:
        type: docker-image
        source: { repository: youraccount/uaa }
      run:
        path: sh
        args:
        - -exc
        - |
          export TERM=dumb
          cd uaa_sources
          ./gradlew :cloudfoundry-identity-uaa:war
          mv uaa/build/libs/cloudfoundry-identity-uaa-*.war ../uaa_war
  - put: uaa-build
    params:
      file: uaa_war/cloudfoundry-identity-uaa-*.war
The resource_types section defines external resource types by specifying the Docker image that encapsulates the logic for checking, pulling, and pushing artifacts. The put step at the end uploads the WAR file to Artifactory.
Step 5 — Create RDBMS instances
The UAA requires a relational database (PostgreSQL or MySQL). If you can't create database instances, you can use HSQLDB — a lightweight embedded database. However, this means you can't scale the UAA and all data is lost on restart.
Create a PostgreSQL instance in both Cloud Foundry spaces:
cf login -a https://api.aws.ie.a9s.eu
cf target -s test
cf create-service a9s-postgresql postgresql-single-small uaadb
cf target -s production
cf create-service a9s-postgresql postgresql-single-small uaadb
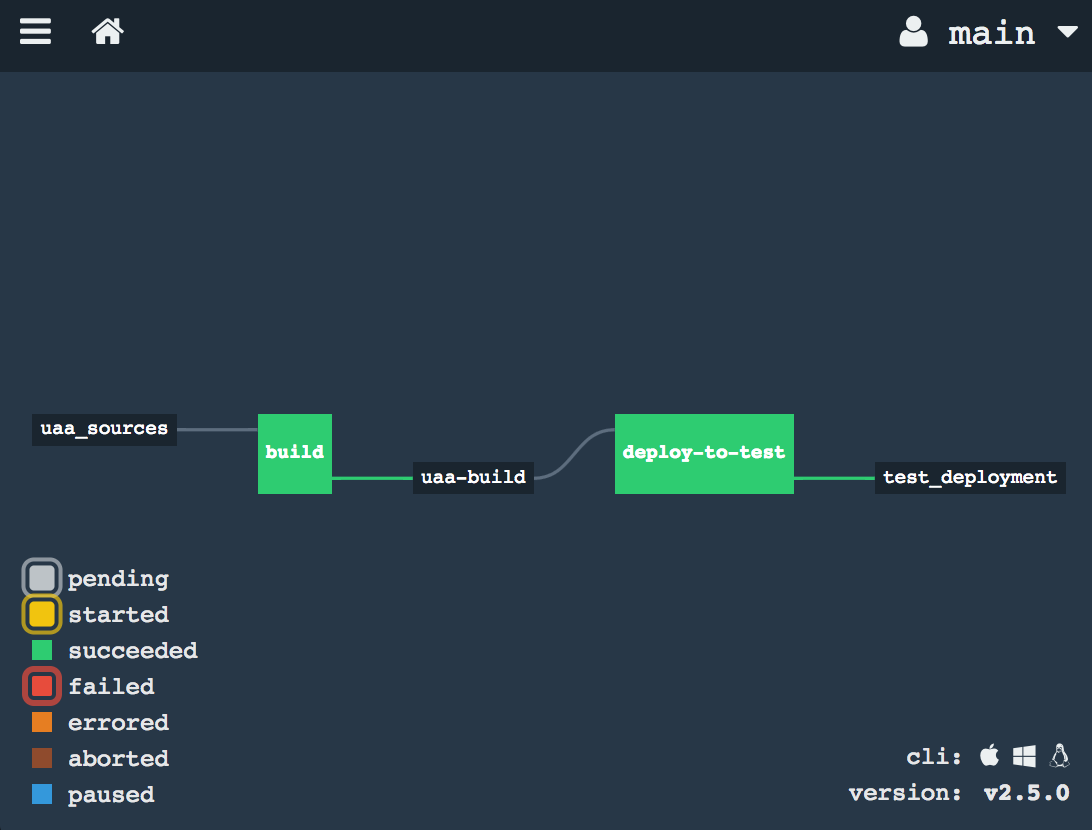
Step 6 — Deploy the UAA to the test environment
Extend uaa.yml with a Cloud Foundry resource and a deploy job:
- name: test_deployment
  type: cf
  source:
    api: https://api.aws.ie.a9s.eu
    username: your-user
    password: your-password
    organization: your-org
    space: test
    skip_cert_check: false
And a new job:
- name: deploy-to-test
  plan:
  - get: uaa-build
    passed: ['build']
    trigger: true
  - task: add-manifest-to-uaa-build
    config:
      platform: linux
      inputs:
      - name: uaa-build
      outputs:
      - name: uaa-build-with-manifest
      image_resource:
        type: docker-image
        source: { repository: youraccount/uaa }
      run:
        path: sh
        args:
        - -exc
        - |
          cp uaa-build/* uaa-build-with-manifest
          export WAR_PATH=$(cd uaa-build-with-manifest && ls cloudfoundry-identity-uaa-*.war)
          cat <<EOT >> uaa-build-with-manifest/manifest.yml
          applications:
          - name: uaa
            memory: 512M
            path: ${WAR_PATH}
            host: test-uaa
            services:
            - uaadb
            env:
              JBP_CONFIG_SPRING_AUTO_RECONFIGURATION: '[enabled: true]'
              JBP_CONFIG_TOMCAT: '{tomcat: { version: 7.0.+ }}'
              SPRING_PROFILES_ACTIVE: postgresql,default
              UAA_URL: https://test-uaa.aws.ie.a9sapp.eu
              LOGIN_URL: https://test-uaa.aws.ie.a9sapp.eu
          EOT
  - put: test_deployment
    params:
      manifest: uaa-build-with-manifest/manifest.yml
The passed: ['build'] constraint ensures that only artifacts that have passed the build job are deployed.
Step 7 — Send an email notification
Add an email resource type and resource, then use on_success and on_failure hooks on the build task to send notifications with the commit details. The Concourse email resource is an external resource type that requires SMTP configuration.
Step 8 — Deploy the UAA to the production environment
The production deployment job is similar to the test deployment, but with two key differences:
passed: ['deploy-to-test']— ensures only versions that have been deployed to test are eligible- No
trigger: true— production deployments must be triggered manually
- name: deploy-to-production
  plan:
  - get: uaa-build
    passed: ['deploy-to-test']
  - task: add-manifest-to-uaa-build
    # ... same as deploy-to-test but with production URLs ...
  - put: production_deployment
    params:
      manifest: uaa-build-with-manifest/manifest.yml
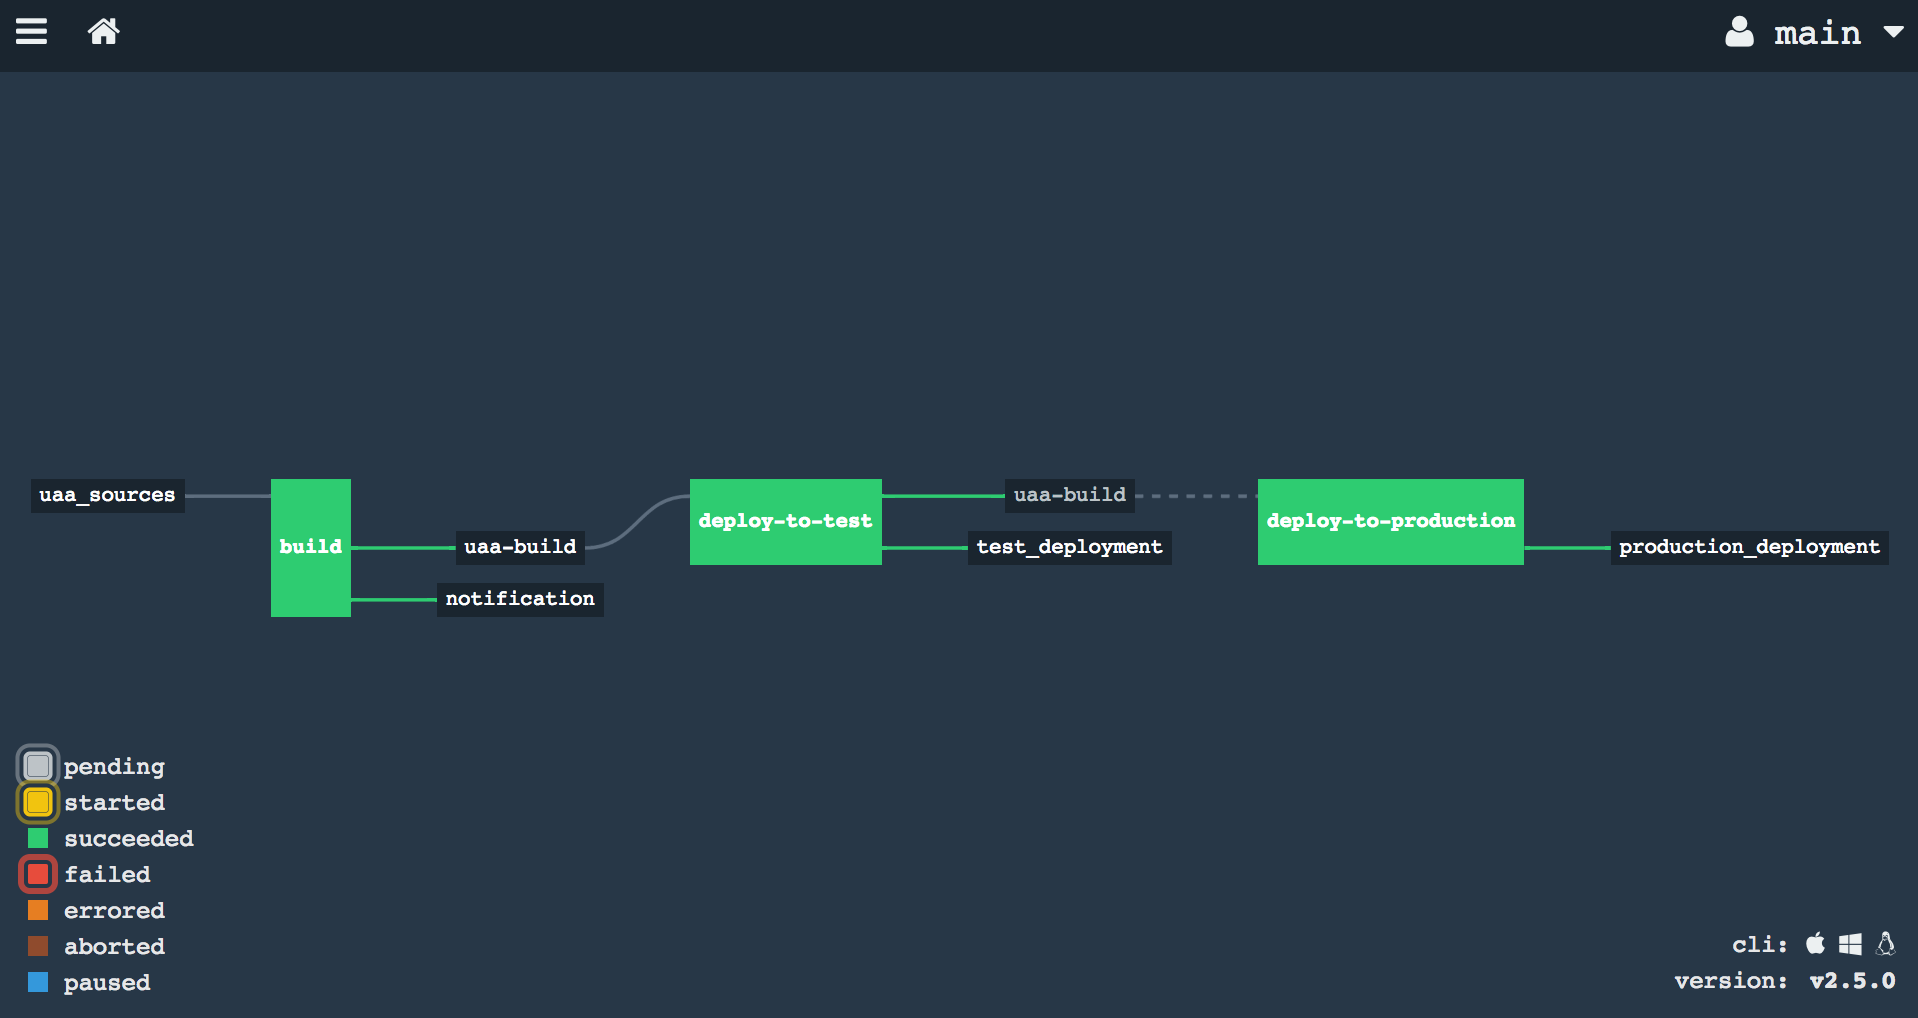
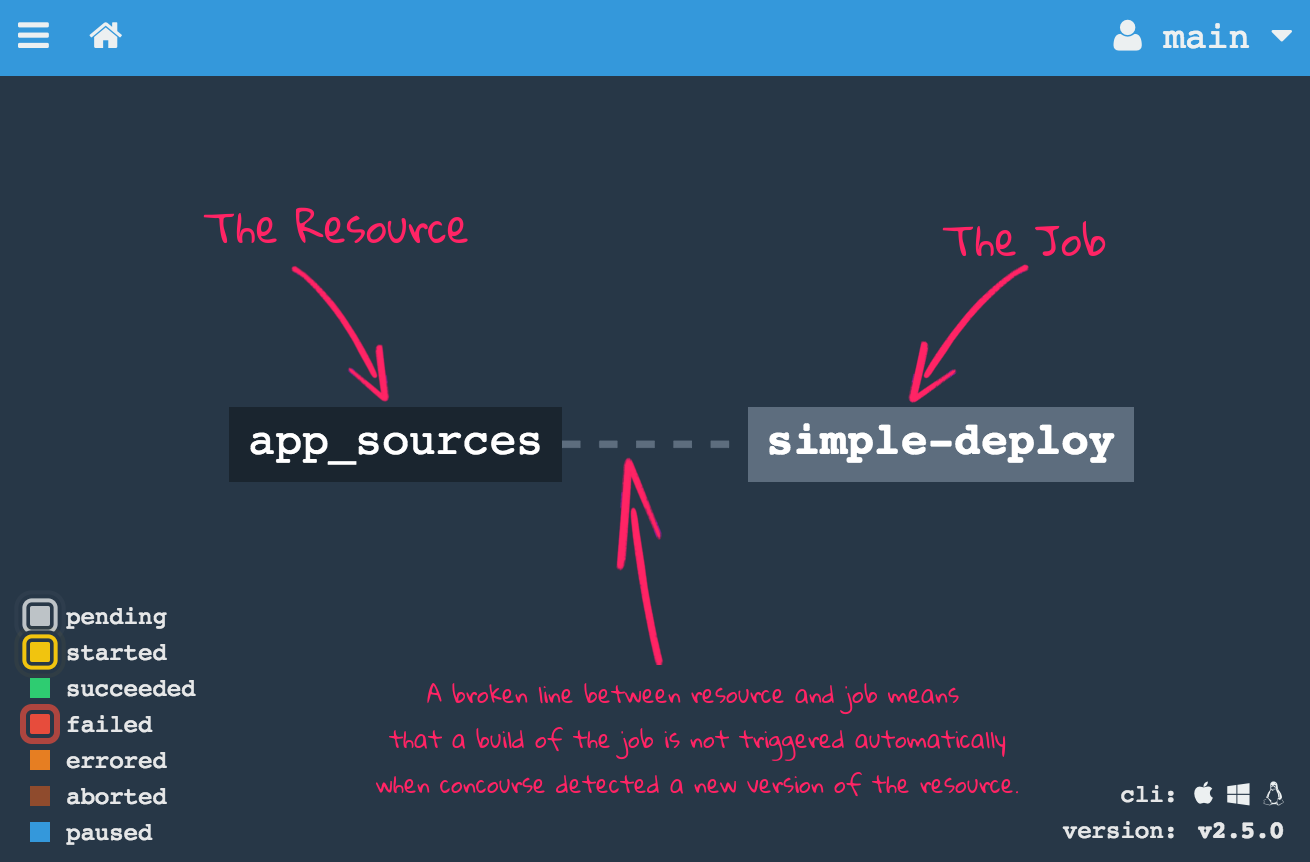
Note the broken line between the "uaa-build" resource and "deploy-to-production" — this indicates that production deploys must be triggered manually via the Concourse web interface.